

Deploying Java library to Maven Central
Learn to deploy Java library to Maven central step by step


There might be time when you created an awesome Java library which you want to share with your colleagues or even better, with anyone in the world who would like to use your library. With your colleagues, you can easily share the JAR files but sharing your library with someone you don’t know is not that straightforward. You can achieve this by publishing your library in Maven central repository, and from there, anyone who is interested in using your library can simply add dependency of your library in their project and Maven will download it for them.
Now the question comes, how to publish the library to Maven central? What steps needs to be done in order to setup space for your library in Maven central? Let’s take a look at all the steps you need to do to publish your library in Maven central.
Apply for Maven central space on OSSRH Sonatype Repository
The first step is that you must create a Jira account in OSSRH Jira dashboard. This step will be done by the project owner who owns the project or have the rights to publish the project.
Once the Jira account is created, next step is to login to Jira and raise a ticket in Jira. In issue creation pop-up, select Project as Community Support — Open Source Project Repository Hosting (OSSRH) and issue type as New project.
Similarly you must update all the other fields as per you project details, like
- Summary: Basic title mentioning your project group id
- Description: Brief description about the ticket
- Group ID:
groupIdyou want to register on Maven central - Project URL: You’re GitHub repository URL, or any source control hosted repository URL.
- SCM URL: Your repository cloning URL
- Usernames: Jira username who will have rights to publish releases to Maven central
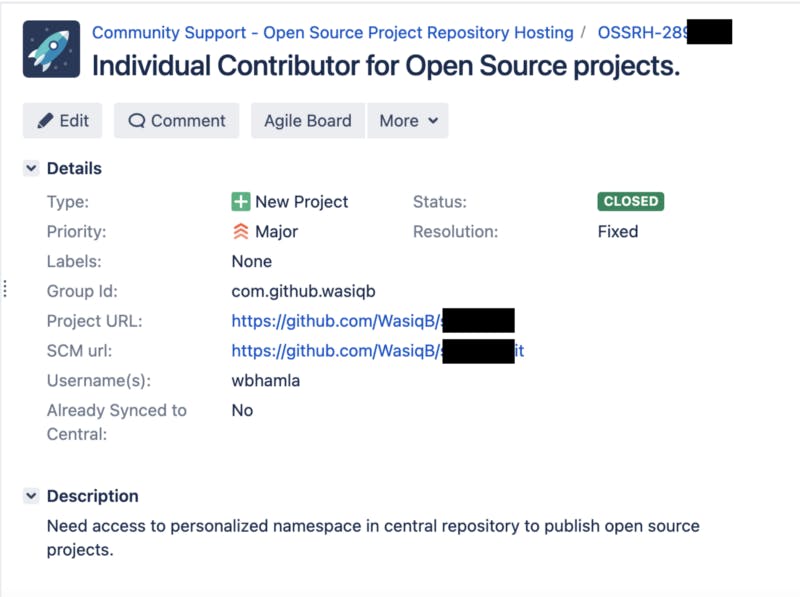
Example from my old ticket
Once the ticket is raised, it will take around 2 business days to get your Maven space ready. You’ll get the confirmation on your Email.
Project requirements and required metadata
Once your Maven space is setup, now you must make sure that your project meets the requirement set by Maven before you can publish your first release. Their requirements are mentioned below:
- Your project library must provide a javadoc and sources JAR files along with your library JAR file.
- Your JAR files must be GPG signed
- Your project
pom.xmlshould have required metadata and correct project co-ordinates (Group ID, artifact ID and version)
Preparing pom.xml file for Maven deployment
Now we will look into the changes needed in pom.xml in order to make it comply with Maven requirements and help you deploy your library to Maven.
Project co-ordinates
First you must set your project co-ordinates correctly.
. . .
<groupId>com.github.wasiqb.myproject</groupId>
<artifactId>mypro</artifactId>
<version>1.0.0</version>
. . .
- Group ID: Itwill start with out organisation domain name and it will start in reverse order, e.g. if you’re an individual contributing on GitHub, you’re group id will start with
com.github.yourusernameor if you’re having a registered domainmydomain.com, then your group id will start ascom.mydomain. - Artifact ID: It is your project name which you want to be displayed in Maven
- Version: Version number should ideally follow semantic versioning ideology.
Project details
Now you need to set your project details, for this you need to update following details in pom.xml
. . .
<name>${project.groupId}:${project.artifactId}</name>
<description>Your project description</description>
<url>https://github.com/your-user/your-project</url>
. . .
License details
You need to mention what license your project will be using, same can be updated as,
. . .
<licenses>
  <license>
    <name>The Apache License, Version 2.0</name>
    <url>http://www.apache.org/licenses/LICENSE-2.0.txt</url>
  </license>
</licenses>
. . .
Developer details
Now you need to mention details about all the developers working on your project as described below,
. . .
<developers>
  <developer>
    <name>Wasiq Bhamla</name>
    <email>mymail@gmail.com</email>
    <organization>My Organisation</organization>
    <organizationUrl>http://www.org-domain.com</organizationUrl>
  </developer>
</developers>
. . .
SCM details
Here you need to mention details about your source control management tool, you can describe the same as,
. . .
<scm>
  <connection>scm:git:git://github.com/WasiqB/coteafs-appium.git</connection>
  <developerConnection>scm:git:ssh://github.com:WasiqB/coteafs-appium.git</developerConnection>
  <url>http://github.com/WasiqB/coteafs-appium</url>
</scm>
. . .
Distribution management
You must also update distribution management details which will tell Maven where to publish your release. You can do the same as,
. . .
<distributionManagement>
  <snapshotRepository>
    <id>ossrh</id>
<url>https://s01.oss.sonatype.org/content/repositories/snapshots</url>
  </snapshotRepository>
  <repository>
    <id>ossrh</id>
<url>https://s01.oss.sonatype.org/service/local/staging/deploy/maven2</url>
  </repository>
</distributionManagement>
. . .
GPG keys to sign library
One more thing you need to do is create your own GPG key which will be used by Maven to sign our JAR files. This is required by Maven central that all our JAR files which will get published should be digitally signed using GPG keys.
Creating GPG keys involve some more steps, including them here will increase the size of this post, so I would suggest to follow the steps from this useful blog post.
Once the key is created, you need to is update pom.xml to use those GPG keys.
. . .
<build>
  <plugins>
    <plugin>
      <groupId>org.apache.maven.plugins</groupId>
      <artifactId>maven-gpg-plugin</artifactId>
      <version>3.0.1</version>
      <executions>
        <execution>
          <id>sign-artifacts</id>
          <phase>verify</phase>
          <goals>
            <goal>sign</goal>
          </goals>
          <configuration>
            <gpgArguments>
              <arg>--pinentry-mode</arg>
              <arg>loopback</arg>
            </gpgArguments>
          </configuration>
        </execution>
      </executions>
    </plugin>
  </plugins>
</build>
. . .
Creation of separate JavaDocs and sources JAR’s
In order to create separate JAR’s for JavaDocs and sources, you must add following block in pom.xml plugins section,
. . .
<build>
  . . .
  <plugin>
    <groupId>org.apache.maven.plugins</groupId>
    <artifactId>maven-source-plugin</artifactId>
    <version>3.2.1</version>
    <executions>
      <execution>
        <id>attach-sources</id>
        <goals>
          <goal>jar-no-fork</goal>
        </goals>
      </execution>
    </executions>
  </plugin>
  <plugin>
    <groupId>org.apache.maven.plugins</groupId>
    <artifactId>maven-javadoc-plugin</artifactId>
    <version>3.3.1</version>
    <configuration>
      <encoding>UTF-8</encoding>
    </configuration>
    <executions>
      <execution>
        <id>attach-javadocs</id>
        <goals>
          <goal>jar</goal>
        </goals>
      </execution>
    </executions>
  </plugin>
  . . .
</build>
. . .
Maven nexus staging plugin
Maven will use nexus staging plugin to deploy the library, you can add the same in pom.xml as,
. . .
<plugin>
  <groupId>org.sonatype.plugins</groupId>
  <artifactId>nexus-staging-maven-plugin</artifactId>
  <version>1.6.8</version>
  <extensions>true</extensions>
  <configuration>
    <serverId>ossrh</serverId>
    <nexusUrl>https://s01.oss.sonatype.org/</nexusUrl>
    <autoReleaseAfterClose>true</autoReleaseAfterClose>
  </configuration>
</plugin>
. . .
Maven settings file
Lastly, you will need custom .m2 settings file which will have the data required for Maven to deploy the library to Maven central.
For this, you can created settings.xml file anywhere in your project, having following content.
<settings xmlns="http://maven.apache.org/SETTINGS/1.0.0"
        xmlns:xsi="http://www.w3.org/2001/XMLSchema-instance"
        xsi:schemaLocation="http://maven.apache.org/SETTINGS/1.0.0
              http://maven.apache.org/xsd/settings-1.0.0.xsd">
   <profiles>
      <profile>
         <id>ossrh</id>
         <activation>
            <activeByDefault>true</activeByDefault>
         </activation>
         <properties>
            <gpg.executable>gpg</gpg.executable>
            <gpg.passphrase>${env.GPG\_PASSPHRASE}</gpg.passphrase>
         </properties>
      </profile>
   </profiles>
   <servers>
      <server>
         <id>ossrh</id>
         <username>${env.NEXUS\_USERNAME}</username>
         <password>${env.NEXUS\_PASSWORD}</password>
      </server>
   </servers>
</settings>
It is best practice, NOT to add any secret data in our files which we commit to source control tool. It’s advised to use environment variables instead.
Creating Maven profile for release
In Maven, you can create profiles which you can use when you need it. In this case, you can create a release profile which will contain all the required plugins in the profile. This way, you will avoid downloading the plugins when you need to just compile the project.
To create profile, you can create a profile block in pom.xml and move all the plugins you added until now, into this profile block.
. . .
<profiles>
  <profile>
    <id>release</id>
    <build>
      <plugins>
        . . . add plugins from above here . . .
      </plugins>
    </build>
  </profile>
</profiles>
. . .
Deploying to Maven central
Finally, after completing all the setup mentioned until this point, you are now ready to deploy your library to Maven central. But before deploying you need to make sure that you have updated the library version accordingly.
You will first deploy SNAPSHOT release, hence, you need to add -SNAPSHOT after your version number, e.g.: <version>1.0.0-SNAPSHOT</version>
Once the version is updated, you will run the following command to deploy snapshot release,
> mvn clean deploy --settings path/to/settings.xml -DskipTests -B -P release
This command will take around 2 mins for snapshot deployment and around 5 mins for main deployment
Once snapshot release is done, you now need to remove -SNAPSHOT from version and execute same command for deploying main version.
In order to confirm that deployment was done successfully you can login to Nexus dashboard using your Jira credentials which you created earlier and searching for your group id.
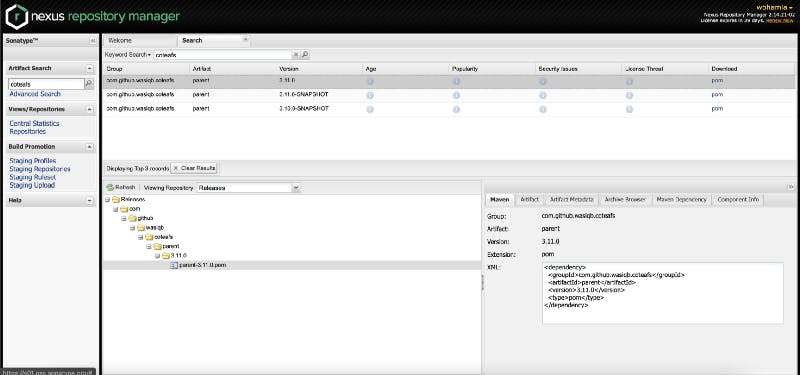
Nexus dashboard showing your deployed library
Wrap up!
The process of Maven deployment looks exhaustive but most of the things done in this post is one time setup, in your next release, you’ll only need to update the version and release the library using the command mentioned earlier.
Let me know how you liked the post, any doubts which you might have related to this post by putting it in the comments below. If you liked the post, do share with your network and give it a 👏.