Upload Mobile app to BrowserStack with GitHub Actions
Automated approach to upload test application to BrowserStack server with GitHub Actions

I am Quality Analyst having 15+ years of experience in Test Automation and Manual Testing of Web, Android, iOS, API and Desktop based applications.
I am also an active open source contributor on GitHub where I am maintainer and contributor to some of popular open source projects like Boyka-framework, AppiumTestDistribution.
I like to code, hence I self taught React JS and Docusaurus 2 to create documentation site for some of my projects.
Upload mobile app to BrowserStack with GitHub Actions
There are times when you need to increase your testing coverage for Mobile applications by testing on wide range of different devices for Android and iOS. But this is not easy to setup in-house, that’s when cloud based solution providers comes into play where they allow their users to use their wide range of devices for testing.
One such cloud provider is BrowserStack. They provide wide range of real and virtual devices for testing. To test your Mobile application on their platform, you must first upload your application onto their servers either from their dashboard or by using their app-automate API. Once the application is uploaded, they will share a uniquely generated URL which you can use in your Appium’s app capabilities.
Since mostly our tests are setup to run unattended in a CI pipeline, it does not make sense to upload the application manually. Hence, we can setup uploading of application from the CI workflow.
I’ll share my experience of handling this scenario. In case of my open source project, coteafs-appium, my Android tests were failing after every 30 days as BrowserStack deletes uploaded application in every 30 days. Since, I was using a demo application for testing my framework, there was no need for me to upload the application regularly. Also, my tests were already configured in GitHub Actions, I created a new workflow which will run on scheduled time on 25th of every month to upload the demo application on BrowserStack server.
In my workflow, I used this awesome action which helped in executing http request to hit BrowserStack App Automate API to upload the application. This is how my workflow looked.
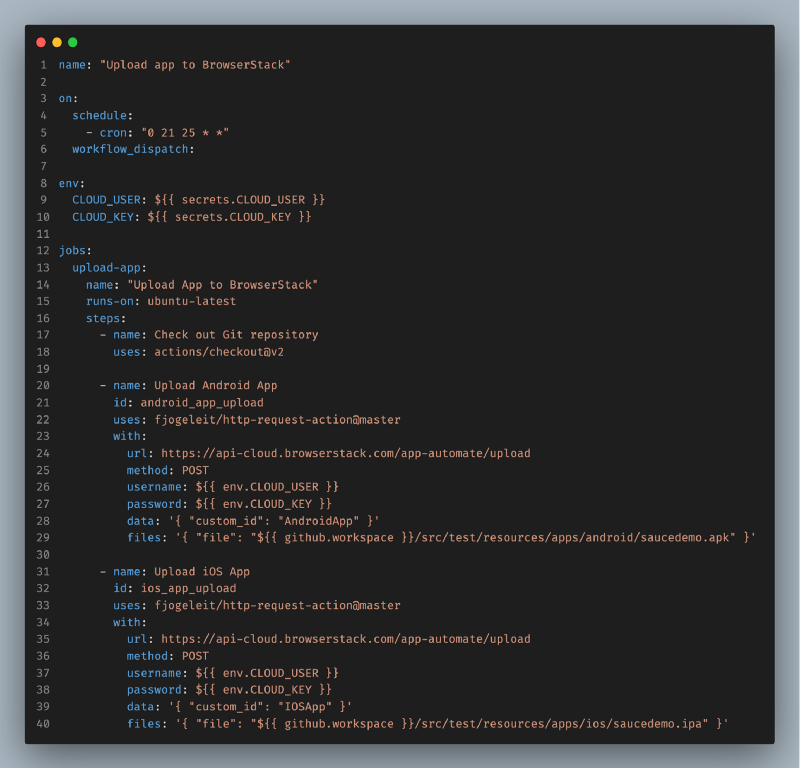
browserstack-app.yml
Few points to note here is,
- I created secret variables for
CLOUD_USERandCLOUD_KEYto store my BrowserStack credentials - Cron job to execute the workflow on 25th of every month
- Using
custom_idwhich will always remain constant, that way, I no longer need to keep track of ever changing dynamic application URL. Now I can use thiscustom_idin myappcapability in Appium - I also added workflow dispatch trigger to allow me to manually trigger the pipeline whenever I need to
Conclusion!
You can check out the complete code for the workflow explained in this post in my project repository. If you were looking for similar solution you can give this approach a try.
Thanks for reading this post! Share your comments below if you have any questions. Share this post with your network if you found it useful. Don’t forget to give a 👏 if you liked this post.


